Samsung refrigerator repair knowledge is crucial for homeowners when these essential appliances stop functioning properly, as a malfunction can cause significant inconvenience. Understanding how to troubleshoot and fix common issues is key. This guide aims to provide clear, step-by-step instructions to address frequent problems encountered with Samsung refrigerators.
From inadequate cooling to strange noises, these issues can stem from various factors, including user error, wear and tear, or mechanical failure. Achieving effective repair often requires a basic understanding of the appliance’s components and functionality. With the right tools and a systematic approach, many common problems can be resolved without the need for professional intervention.
This comprehensive guide will not only help you identify the symptoms of potential problems but will also offer practical solutions to restore your Samsung refrigerator to optimal performance. Whether you are a seasoned DIY enthusiast or a first-time repairer, following this guide will empower you to tackle the task with confidence.

Samsung Refrigerator Repair: Troubleshooting and Repair Guide
When dealing with issues related to your Samsung refrigerator, it’s essential to identify and resolve the problem effectively. Here are common issues and their solutions:
Common Problems
- Fridge Not Cooling:
- Water Leak:
- Excessive Noise:
- Dispensing Issues:
- Ice Build-Up:
Troubleshooting Steps
- Fridge Not Cooling:
- Check the thermostat settings and adjust if necessary.
- Examine the condenser coils for dust and debris; clean them if needed.
- Inspect the door seals for any gaps or damage.
- Water Leak:
- Check the water filter for blockages and replace it if necessary.
- Ensure the drain tube is not clogged.
- Inspect the door for proper closure to prevent condensation.
- Excessive Noise:
- Make sure the refrigerator is level to avoid vibrations.
- Listen for unusual sounds from the condenser fan and evaporator fan; replace if faulty.
- Check for loose items inside the fridge that might be causing noise.
- Dispensing Issues:
- Ensure the water supply line is securely connected and not kinked.
- Test the water filter and replace it if necessary.
- Check for blockages in the dispenser chute.
- Ice Build-Up:
- Defrost the fridge and remove any ice accumulation.
- Inspect the defrost timer and heater for functionality.
- Check the drainage pan for proper installation.
When to Call a Professional
If the troubleshooting steps do not resolve the issue, it is advisable to contact a certified technician. Issues such as compressor failure, sealed system repairs, and electronic control malfunctions require professional expertise.
Preventive Maintenance Tips
- Regularly clean the condenser coils every six months.
- Replace water filters according to the manufacturer’s recommendations.
- Check door seals periodically to maintain efficiency.
- Maintain a consistent temperature setting for optimal performance.
Identifying Common Issues with Samsung Refrigerators
Samsung refrigerators are known for their advanced features and reliability, but like any appliance, they can experience problems over time. Recognizing common issues is the first step towards effective troubleshooting and repair.
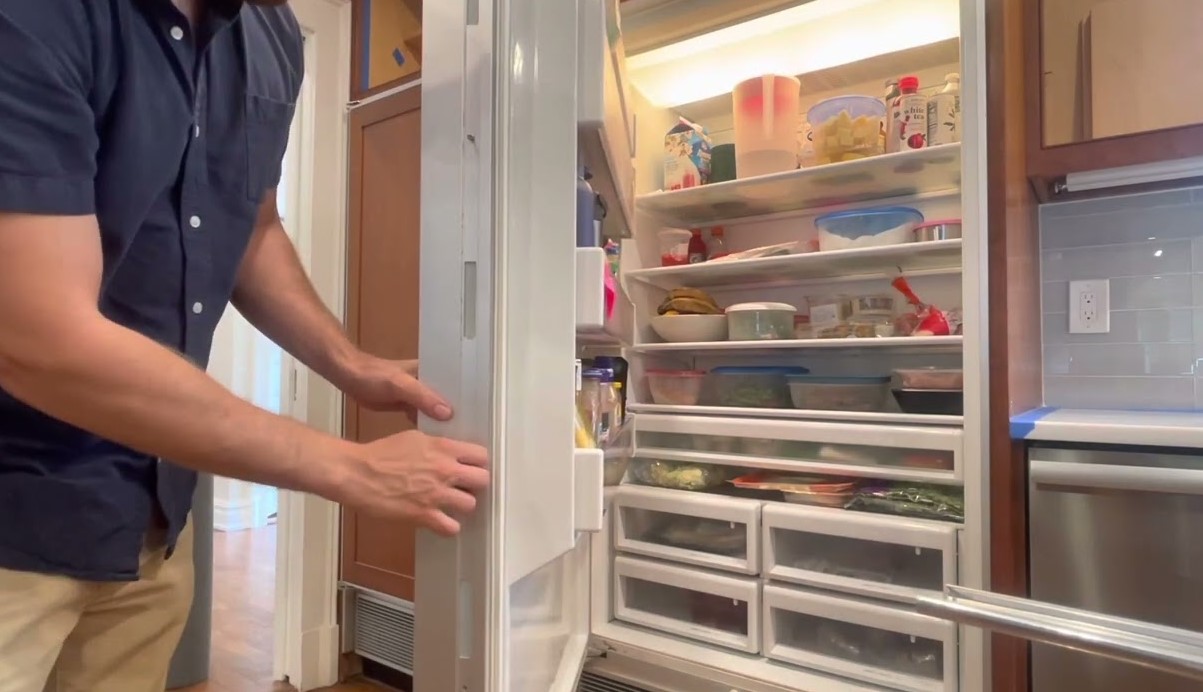
One prevalent issue is inconsistent cooling. This can manifest as food not staying cold enough, or fluctuating temperatures in different compartments. Check the temperature settings; they should typically be set between 37°F and 40°F for the refrigerator and 0°F for the freezer. Inspect the door seals for damage or debris, which may prevent a proper seal, causing cool air to escape.
Noisy operation is another common complaint. Unusual sounds may indicate issues with the compressor, evaporator fan, or condenser fan. If the refrigerator is making grinding, rattling, or buzzing noises, it is advisable to listen closely to identify the source and determine if a part replacement is necessary.
Leaks around the refrigerator often signal a clogged defrost drain or problems with the water supply line. Investigate if the drain is obstructed, as this can cause water to pool inside or outside the unit. Additionally, if the water dispenser isn’t functioning, check for kinks in the water line or a malfunctioning water filter that may need replacement.
Another concern is excessive frost buildup in the freezer. This can be attributed to a faulty door seal, leading to moisture entering the freezer. Additionally, a malfunctioning defrost heater may fail to eliminate frost build-up effectively. Inspecting these components can help address the root of the issue.
Lastly, if your refrigerator does not turn on, confirm that it is plugged in and that the outlet is functioning. A blown fuse or tripped circuit breaker may also be responsible. If power is not the issue, consider checking the thermostat or compressor relay, which could be faulty.
By identifying these common problems, you can undertake effective troubleshooting and repair steps, ensuring your Samsung refrigerator operates smoothly and efficiently.
How to Diagnose Temperature Problems in Your Refrigerator
Temperature issues in a refrigerator can lead to food spoilage and affect overall efficiency. Diagnosing these problems involves a systematic approach to identify the cause. Follow these steps to effectively troubleshoot temperature issues in your Samsung refrigerator.
Step 1: Check the Thermostat Settings
Start by verifying the thermostat settings:
- Ensure the temperature settings are within the recommended range, typically 37°F (3°C) for the refrigerator and 0°F (-18°C) for the freezer.
- Adjust the settings if necessary, and allow a few hours for the temperature to stabilize.
Step 2: Inspect Door Seals
Damaged or dirty door seals can allow cold air to escape, leading to temperature fluctuations.
- Check for cracks or tears in the rubber seals around the doors.
- Clean the seals with warm, soapy water to remove dirt and debris that may prevent proper sealing.
- Test the effectiveness by closing the door on a piece of paper; if it slides out easily, the seals may need replacement.
Step 3: Assess Airflow
Proper airflow is essential for maintaining consistent temperatures.
- Ensure that vents inside the refrigerator are not blocked by food items.
- Check the back of the refrigerator for dust buildup on the condenser coils, which can hinder cooling performance.
- Vacuum or clean the coils regularly to ensure optimal airflow.
Step 4: Listen for Unusual Noises
Noises can be indicative of mechanical issues:
- If the refrigerator is making loud or unusual sounds, this could point to a failing compressor or a malfunctioning fan.
- Pay attention to any grinding, knocking, or rattling sounds, as they may signal a serious issue that requires professional inspection.
Step 5: Check the Compressor and Fans
The compressor and fans are crucial for maintaining low temperatures:
- Ensure the compressor is running; it should cycle on and off periodically.
- Listen for the evaporator fan inside the refrigerator. If it is not operating, the refrigerator may not cool properly.
Step 6: Monitor Internal Temperature
To accurately assess temperature problems, use an appliance thermometer:
- Place the thermometer inside the refrigerator and check the reading after several hours.
- Compare the reading to the thermostat settings to identify discrepancies.
Step 7: Contact Professional Repair Services
If, after troubleshooting, the problem persists, it may be time to consult a professional:
- Document the issues you’ve observed, including temperature readings and any noises.
- Contact Samsung customer service or a certified technician for further assistance or repairs.

Steps to Fixing a Leaking Samsung Refrigerator
Identifying and fixing a leak in your Samsung refrigerator can prevent further damage and improve efficiency. Follow these steps for troubleshooting and repair.
1. Identify the Source of the Leak
Before making any repairs, determine where the water is coming from. Common sources include:
| Source | Description |
|---|---|
| Door Seals | Check if the door seals are damaged or dirty, as this can lead to condensation inside the fridge. |
| Defrost Drain | Inspect the defrost drain for clogs; a blocked drain can cause water to pool inside the refrigerator. |
| Water Filter | Ensure the water filter is correctly installed and not leaking. |
| Ice Maker | Examine the ice maker and its connections for leaks or loose fittings. |
2. Perform Necessary Repairs
Once the source of the leak is identified, proceed with repairs:
For Door Seals: Clean the seals with warm soapy water to remove dirt or debris. If they are cracked, consider replacing the seals.
For Defrost Drain: Clear any obstructions using warm water or a flexible cleaning tool. Ensure the drain is free from ice buildup.
For Water Filter: If the filter is improperly installed, remove and reinstall it according to the manufacturer’s instructions. Replace it if it’s damaged.
For Ice Maker: Tighten any loose connections and inspect the water line for pinches or damage. Replace any faulty components.
After performing repairs, monitor the refrigerator for any signs of continued leaking to ensure the problem is resolved.
Troubleshooting Loud Noises Coming from Your Refrigerator
Loud noises from your refrigerator can be a cause for concern, indicating potential issues that need to be addressed. Identifying the source of the noise is crucial for determining the necessary steps for repair. Here are common causes and troubleshooting tips for loud refrigerator noises.
Common Sources of Noise
1. Compressor Sounds: A functioning compressor can create a humming or buzzing noise as it cycles on and off. However, if the sound is excessively loud or accompanied by vibrations, the compressor may be failing.
2. Fan Noises: Refrigerators typically have two fans: one for the evaporator and another for the condenser. Rattling or grinding noises may suggest that debris is obstructing the fan, or the fan blades may be damaged and needing replacement.
3. Defrost Timer: The defrost timer can emit clicking sounds while operating. If the clicking becomes irregular or loud, the timer might require replacement.
Troubleshooting Steps
Begin by assessing where the noise is coming from. Open the refrigerator door and listen for the source. If the sound is coming from the back, it could indicate a problem with the condenser fan or compressor. Unplug the refrigerator and inspect for any debris or blockages. Clean or clear any obstructions that you find.
If the noise persists, check the position of the refrigerator. Ensure that it is level and firmly positioned on the floor. Uneven surfaces can lead to increased vibrations. Use a level tool to adjust the legs if necessary.
Listen for noises while the refrigerator is operating in both cooling and defrost modes; this can help pinpoint the issue. If the compressor or fans continue to make loud noises, it may be time to consult a professional repair technician to evaluate and replace malfunctioning components.
Regular maintenance, including cleaning the coils and checking for ice buildup, can prevent many noise-related issues. Following these steps will help ensure that your refrigerator operates quietly and efficiently.
What to Do When Your Samsung Refrigerator Won’t Cool
If your Samsung refrigerator is not cooling, follow these steps to identify and potentially resolve the issue. Start by checking the temperature settings. Make sure that the refrigerator is set to the desired temperature, typically between 35°F to 38°F (1.6°C to 3.3°C). If it is set correctly, move to the next steps.
Inspect the door seals for any damage or dirt. Worn or dirty door gaskets can prevent the fridge from sealing properly, allowing cold air to escape. Clean the seals with warm, soapy water and ensure they are intact. If damaged, consider replacing them.
Next, ensure that the condenser coils are clean and free of dust. Blocked coils can cause overheating and hinder cooling efficiency. Access the coils, usually located at the back or bottom of the refrigerator, and clean them with a vacuum or brush.
Check the airflow inside the refrigerator. Make sure that the vents are not blocked by food items. Proper airflow is crucial for maintaining consistent temperatures. Rearrange items if necessary to ensure that air can circulate freely.
Examine the evaporator fan. If the fan is not running, it may be defective. Listen for any unusual noises coming from the fridge; if you don’t hear the fan, it may need to be replaced. Additionally, inspect the temperature control thermostat. If the thermostat is faulty, it may not send the right signals for cooling.
If your refrigerator has a built-in ice maker, ensure it is not malfunctioning, as this can affect overall cooling. Turn off the ice maker to see if cooling improves. Also, check the defrost system, as a malfunction can cause frost buildup, impacting the refrigerator’s cooling ability.
If none of the above steps resolve the issue, it may be time to consult a professional technician. They can diagnose more complex problems, such as compressor issues or refrigerant leaks, which require specialized knowledge and tools to fix. Document any error codes displayed on the control panel, as this information can assist the technician in diagnosing the problem.
How to Resolve Ice Maker Issues in Samsung Models
Ice maker problems in Samsung refrigerators can stem from various causes. Identifying the specific issue is essential for effective troubleshooting. Begin by checking the water supply. Ensure that the water line is properly connected, and there are no kinks or blockages. If the line is frozen, defrost it gently to restore flow.
Next, verify that the ice maker is turned on. Locate the control arm or switch, usually inside the ice maker compartment, and ensure it is in the «on» position. If it appears functional, examine the ice maker’s settings via the refrigerator’s LED display. Adjust the temperature settings if necessary; ice makers typically operate best at temperatures below 10°F (-12°C).
If ice production is slow or nonexistent, inspect the water filter. A clogged or poorly installed water filter can impede water flow. Replace the filter if it has exceeded its lifespan, usually about six months, or clean it if it is a reusable type.
Check for any ice blockage within the ice maker itself. Remove the ice bin and inspect the ice maker for any accumulated ice. If ice is present, gently remove it using a plastic spatula to avoid damaging the components.
Another common issue is the temperature of the freezer compartment. Ensure it is set correctly at or below 0°F (-18°C). If the temperature is too warm, it may prevent proper ice formation.
If the ice maker is still not functioning, the water inlet valve may be faulty. This valve controls water entry into the ice maker, and if it fails, it may need replacement. Conduct a multimeter test to ensure it is receiving power; if not, replacing the valve is necessary.
In some cases, the ice maker assembly itself may be defective. If all previous troubleshooting steps have failed, you may need to replace the entire ice maker unit. Consult your user manual for specific replacement procedures or consider contacting a professional technician.
Regular maintenance is key to avoiding future ice maker issues. Clean the ice maker and surrounding areas periodically and ensure the water supply remains clear of any obstructions. This proactive approach can enhance the lifespan and functionality of your Samsung refrigerator’s ice maker.
Checking and Replacing Faulty Door Seals
Door seals, also known as gaskets, play a crucial role in maintaining the efficiency of your Samsung refrigerator. They create an airtight seal that prevents cold air from escaping and warm air from entering. Over time, wear and tear can lead to damage, resulting in increased energy consumption and potential food spoilage.
To check for faulty door seals, start by visually inspecting the gasket for any signs of cracks, tears, or visible warping. Pay close attention to the corners where damage is most likely to occur. Additionally, perform the «dollar bill test» by closing the refrigerator door on a dollar bill. If you can easily pull the bill out without resistance, the seals may be compromised.
If you find that your seals are damaged, replacing them is a straightforward process. First, purchase a compatible replacement gasket specific to your refrigerator model. Refer to your user manual or the manufacturer’s website to ensure you find the right part.
Next, remove the faulty gasket by unscrewing or prying it off from the door frame. Clean the area where the new gasket will be installed, removing any dust or debris that may hinder adhesive properties. Align the new gasket on the door frame, ensuring it sits evenly before securing it in place. Depending on your model, you may need to use screws or adhesive to secure the new seal.
After installation, test the new seal by repeating the dollar bill test. A slight drag when pulling the bill should indicate that the seal is functioning correctly. Maintaining proper door seals will help your refrigerator operate efficiently while preserving the quality of your food.

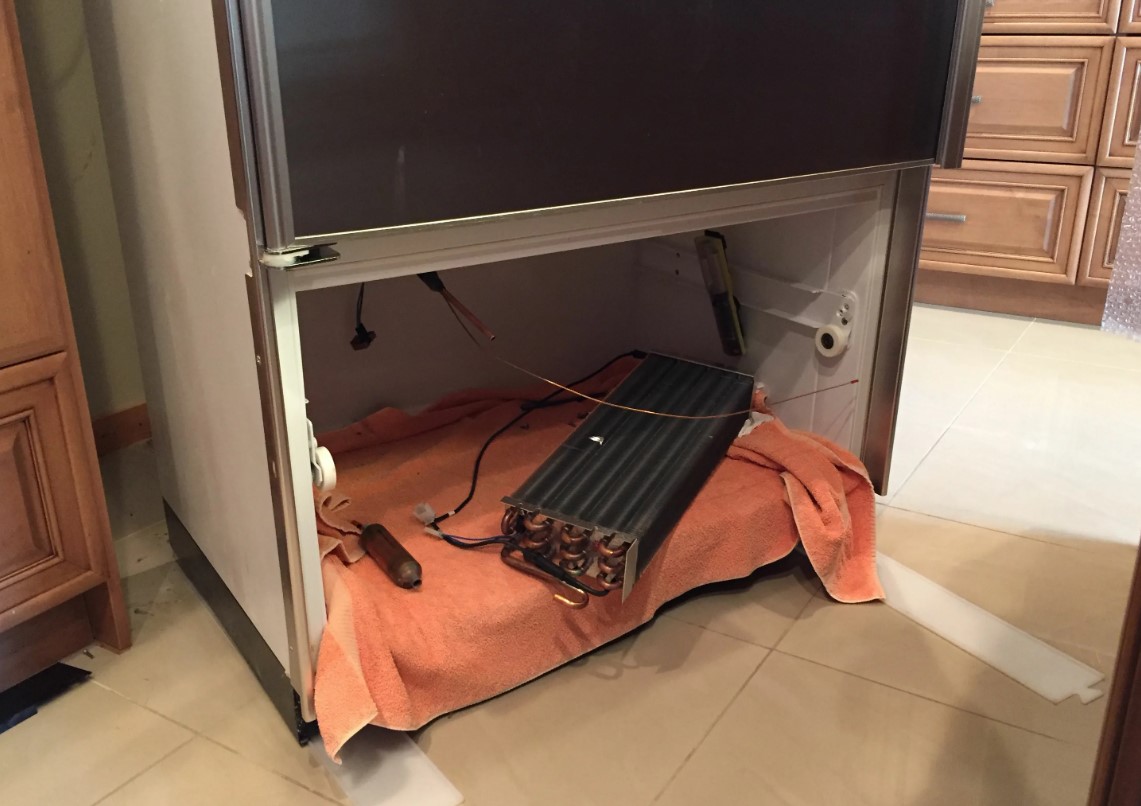
How to Clean and Maintain Your Samsung Refrigerator Coils
Cleaning and maintaining the coils of your Samsung refrigerator is essential for efficient operation and longevity. Dust and debris can accumulate on the coils, reducing cooling efficiency and increasing energy consumption. Follow these steps to ensure your coils remain clean and your refrigerator operates optimally.
Tools Required:
- Soft brush or coil cleaning brush
- Vacuum cleaner with a brush attachment
- Cloth or microfiber towel
- Soap and water (optional)
Step-by-Step Cleaning Process:
- Locate the Coils: Depending on your model, the coils can be found either on the back or underneath the refrigerator.
- Unplug the Refrigerator: For safety, unplug the refrigerator before starting the cleaning process.
- Access the Coils: If coils are located underneath, remove the front grille or cover to access them. If they are on the back, ensure you move the refrigerator away from the wall.
- Brush Away Dust: Use a soft brush or coil cleaning brush to gently remove dust and debris from the coils. Brush in a direction that follows the coils for best results.
- Vacuum the Area: After brushing, use a vacuum cleaner with a brush attachment to suck up any loose dirt and debris from the coils and surrounding area.
- Wipe Down Surfaces: If necessary, clean the surrounding surfaces with a cloth dampened with soap and water. Avoid using abrasive cleaners.
- Reassemble Any Parts: If you removed any covers or grilles, reattach them securely.
- Plug in the Refrigerator: Return the refrigerator to its original position (if moved) and plug it back in.
Maintenance Tips:
- Inspect the coils every six months to ensure they remain clean.
- Keep the area around the refrigerator clear of dust and debris to reduce the frequency of cleaning.
- Consider using a coil cover to prevent dust from accumulating.
Regular maintenance of your Samsung refrigerator coils can have a positive impact on performance and energy efficiency. By following these steps, you can help ensure your refrigerator continues to run smoothly.
| Task | Frequency |
|---|---|
| Inspect Coils | Every 6 months |
| Clean Coils | At least once a year |
| Check Surrounding Area | Monthly |
Understanding Error Codes on Samsung Refrigerators
Error codes on Samsung refrigerators serve as diagnostic tools that help users identify issues with their appliance. These codes are displayed on the digital screen when problems arise, allowing for quick troubleshooting. Understanding these codes is essential for effective maintenance and timely repairs.
Common Error Codes
Some of the most frequently encountered error codes include:
- SE (Sensor Error): This code indicates a problem with the temperature sensors in the refrigerator. It may require sensor replacement or wiring checks.
- 5E (Drain Error): The 5E code signifies that there is an issue with the water drain. Clogs or obstructions may need to be cleared to resolve this problem.
- CF (Cooling Failure): This error points to a potential failure in the cooling system, which could involve the compressor or other refrigeration components.
Interpreting and Responding to Error Codes
When an error code appears, users should first consult the refrigerator’s user manual for specific instructions regarding that code. Often, a simple reset may resolve the issue. If the error persists, further investigation may be necessary. Understanding the context of the error–such as temperature changes, unusual noises, or visible leaks–can provide additional clues to the problem’s nature.
For persistent issues or codes that are unclear, contacting a professional technician is advisable. Attempting complex repairs without proper knowledge can lead to further damage or safety hazards. Timely resolution of error codes helps maintain the refrigerator’s efficiency and prolongs its lifespan.
Steps for Resetting Your Samsung Refrigerator
Resetting your Samsung refrigerator can resolve various issues such as temperature fluctuations, water dispenser problems, and ice maker malfunctions. Follow these steps to successfully reset your appliance.
Step 1: Power Off the Refrigerator
Unplug the refrigerator from the wall outlet to power it off. If the outlet is not easily accessible, you can also turn off the circuit breaker dedicated to the refrigerator. Wait for about 5 to 10 minutes before proceeding. This allows the internal components to reset fully.
Step 2: Plug it Back In
After waiting, plug the refrigerator back into the outlet or turn the circuit breaker back on. Ensure that the power supply is stable and the refrigerator is receiving electricity. Check for any lights or noises that indicate that the appliance is starting up properly.
Once powered on, allow the refrigerator to operate for a few hours and monitor its performance. If issues persist after resetting, consider consulting the user manual or contacting Samsung support for further assistance.
When to Call a Professional for Samsung Refrigerator Repairs
Identifying when to seek professional help for your Samsung refrigerator can prevent further damage and save you time and money. Some signs indicate that it’s time to call an expert.
Firstly, if your refrigerator is not cooling adequately despite adjusting the temperature settings, a professional can diagnose issues related to the compressor, evaporator, or refrigerant levels. These components require specialized knowledge and tools to repair.
Secondly, strange noises, such as grinding or hissing, may suggest mechanical issues within the refrigerator. These sounds can point to problems with the fan or condenser, which should be inspected by a technician.
Thirdly, if you notice any leaks or pooling water around the appliance, it could indicate a malfunctioning defrost drain or a faulty seal. Such issues not only affect performance but may also lead to water damage in your home.
Additionally, if the refrigerator is cycling frequently or running continuously without reaching optimal temperatures, this could indicate a malfunctioning thermostat or compressor problem, both of which necessitate professional attention.
Finally, if you encounter an error code on the display, referring to the user manual may provide guidance, but persistent error codes often require professional diagnostic equipment to interpret and fix.
In conclusion, recognizing the signs that necessitate professional repair ensures your Samsung refrigerator operates efficiently and prolongs its lifespan. When in doubt, it’s always safer to consult with a qualified technician.
Organizing Tools and Parts for DIY Refrigeration Repairs
Proper organization of tools and parts is essential for efficient DIY refrigeration repairs. An orderly workspace minimizes stress and increases productivity. Here are key strategies to help you organize effectively:
- Gather Necessary Tools:
- Screwdrivers (flathead and Phillips)
- Wrenches (adjustable and socket)
- Pliers (needle-nose and regular)
- Multimeter for electrical testing
- Pipe wrench for plumbing connections
- Replacement parts, such as seals, thermostats, and fans
- Set Up a Designated Workspace:Choose a clutter-free area with adequate lighting. Ensure you have enough room to move around and work on the refrigerator comfortably.
- Use Organizers:Utilize toolboxes, bins, or pegboards to categorize tools and parts. Label each section clearly to facilitate quick access.
- Sort Parts by Type:
- Group similar parts together, such as electrical components, mechanical parts, and insulation materials.
- Consider using small containers or bags for small items like screws and washers.
- Maintain Inventory:Create a master list of tools and parts you possess. Regularly update it to track usage and reorder items as needed.
- Clean Regularly:Periodically declutter your workspace to remove unnecessary tools or parts. This practice ensures that your workspace remains organized.
- Plan for Repairs:Before starting a repair, gather all necessary tools and parts. This preparation prevents interruptions and keeps you focused on the task.
By implementing these organizational strategies, you can streamline your DIY refrigeration repair process, leading to more efficient and successful outcomes.
Q&A — Samsung refrigerator repair:
What are common issues that can occur with Samsung refrigerators?
Common issues with Samsung refrigerators include temperature inconsistencies, water leakage, strange noises, frost buildup in the freezer, and failure of the ice maker. Each of these problems can often be attributed to specific components like the thermostat, door seals, or defrost system, and may require different troubleshooting approaches to resolve.
How can I troubleshoot my Samsung refrigerator that is not cooling properly?
If your Samsung refrigerator is not cooling properly, check the temperature settings first to ensure they are correctly set. Inspect the condenser coils for dust and debris, as dirty coils can affect cooling efficiency. Make sure the door seals are intact and fully sealing when closed. If these steps don’t resolve the issue, you may need to inspect the evaporator fan and compressor, as they play key roles in cooling the unit.
Is it safe to attempt repairs on my Samsung refrigerator myself?
Attempting repairs on your Samsung refrigerator can be safe as long as you take the proper precautions. Always unplug the appliance before performing any maintenance to avoid electrical shock. If you are not comfortable or lack experience with appliance repair, it may be best to consult a professional technician. Complex issues involving electrical components or refrigerants should generally be left to the experts to ensure safety and proper handling.
What tools do I need for repairing a Samsung refrigerator?
Basic tools for repairing a Samsung refrigerator typically include a screwdriver set (both Phillips and flat-head), a multimeter for electrical testing, a pair of pliers, and possibly a socket set for removing panels. Having cleaning supplies like a vacuum for dust removal and towels for spills can also be helpful. Always ensure you have the necessary tools on hand before starting any repair to avoid interruptions.
What should I check if my Samsung refrigerator is making loud noises?
If your Samsung refrigerator is making loud noises, start by checking the leveling of the appliance; an unlevel fridge can cause vibrations and noise. Inspect the condenser fan for obstructions, as debris can cause it to work harder and make noise. Listen for sounds indicating a failing compressor or evaporator fan. If these checks do not identify the source of the noise, it’s advisable to consult a technician for further diagnosis.
What are the common issues that might require Samsung refrigerator repair?
Samsung refrigerators can experience a variety of problems. Some of the most frequent issues include cooling failures, where the refrigerator does not keep food cold enough. This can be due to a faulty compressor, issues with the thermostat, or clogged condenser coils. Another common problem is water leaks, which may occur if the door seals are damaged or the defrost drain is clogged. Odd noises can also indicate issues, such as a malfunctioning fan or a problem with the compressor. Additionally, if the ice maker is not functioning properly, it could be due to low water supply or a defective ice maker assembly. Regular maintenance can help prevent these issues from escalating.
How can I troubleshoot a Samsung refrigerator that is not cooling?
If your Samsung refrigerator is not cooling, there are several troubleshooting steps you can take. First, check the temperature settings to ensure they are set appropriately. Next, inspect the door seals to make sure they are clean and sealing properly; worn-out seals can cause cool air to escape. Then, examine the condenser coils, usually located at the back or beneath the unit, for any dust buildup; cleaning them can improve efficiency. Additionally, listen for unusual noises that may signify a problem with the compressor or fans. If the refrigerator is still not cooling after these checks, it may be necessary to call a technician for further diagnosis, as the issue could be more complex, such as a refrigerant leak or a malfunctioning control board.
APPLIANCE REPAIR in California — fast, reliable, and affordable service that brings your home appliances back to life. Get expert help today and enjoy worry-free comfort!